These e23's are notorious for HVAC problems. The good news is that many of us have been through them and managed to fix them. If you can do the work yourself, it should not cost a lot to fix your system, even if you had to rebuild everything (which is what I had to do).
Check the simple stuff first, like vacuum pressure. In the absence of good vacuum pressure, the default action of the heater control valve, the one that goes through the firewall on the passenger side next to the white relay, is to allow hot water to pass into the heater core, thus your defrost function works. If you don't smell any antifreeze inside the car, that's good news meaning that at least you don't have a heater core leak.
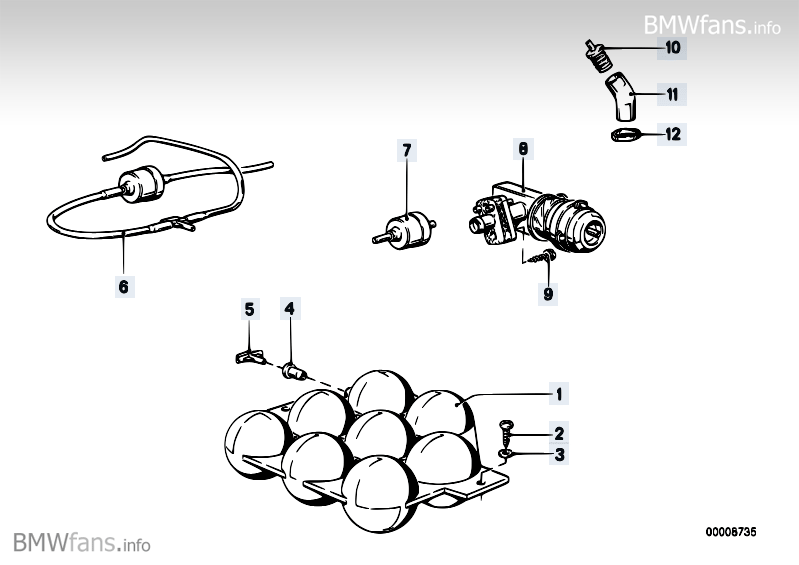
Back to testing the vacuum pressure. Go to you local AutoZone, Advance Auto Parts, etc., and buy a hand vacuum pump with a pressure gauge. It should cost around $25. You'll use it to pressure-test the vacuum lines, starting from the vacuum assist pump in the engine, through the firewall, under the blower cowling to the vacuum pressure reservoir (the 6 black ping-ping balls) and into the cabin. The idea is to test each link in the hoses to determine where the leak lies. There could be multiple leaks, and you won't be able to test all the paths inside the car if your pushbutton panel and rotary wheel switches aren't working. See my earlier posts about repairing these items first:
HVAC pushbutton panel repair
HVAC rotary dial microswitch repair
If those are operating properly but you have a vacuum leak, you'll need to determine the source(s) of the leak(s) and repair them. First, check if your vacuum assist pump in the engine bay is running continuously after you start the car. It should normally shut off in less than a minute. If the pump runs indefinitely, you've got a vacuum leak somewhere in the HVAC system. Just unplug the white electrical connector on the side of the pump until the system is fixed. You don't want to let it pump continuously for a long time as it will eventually burn out the unit. New ones cost over $150.
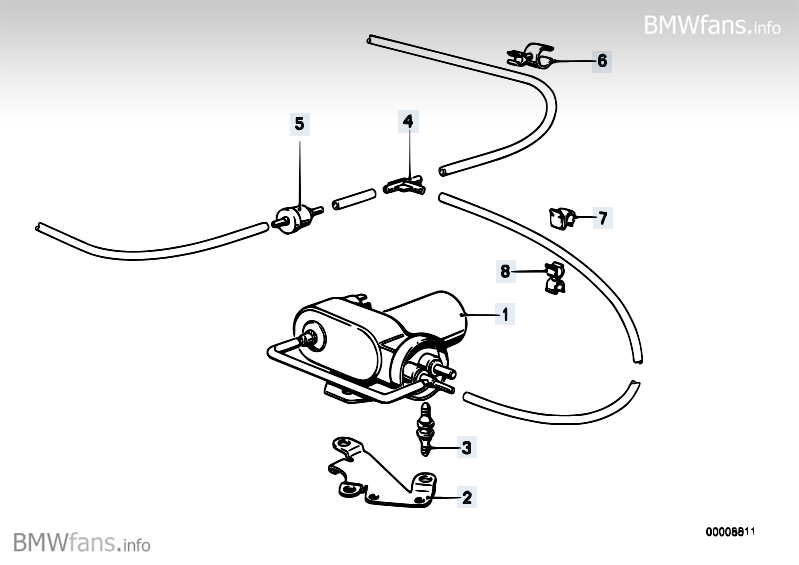
Assuming that there is a leak, diagnosis of the location starts in the engine area at the vacuum assist pump (on the driver's side). Attach your hand-pump to the line going out of the vacuum assist pump and toward a 'T' connection branching off to the underside of the engine after going through a check valve. Examine and test that check valve, too, as mine had to be replaced.
Pump the vacuum gauge to approximately 450 millibars. The system should be able to hold this pressure for at least one minute. Keep plugging and testing the sections of vacuum hose until you get to the firewall. Its convenient to use a small spring clamp to pinch off lengths of vacuum hose while testing sections. Also check the line going into the heater control valve. The rubber diaphragms in these vacuum-powered valves and actuators wear out over time, causing leaks. They cost between $20 and $50 each to replace. There are six of them, if I recall correctly, inside the car under the dashboard. I have a few extras on hand that the dealer wouldn't take back, too.
If you still haven't located the vacuum leak, remove the grills over the blower cowling and remove the metal cowling itself. Inside there, check the 'T' fitting going into the vacuum reservoir, the aforementioned 6-chamber, black, ping-pong-ball-looking thing on the passenger side. That 'T' fitting is notorious for becoming brittle and failing. Also check the hoses going into actuators that operate the fresh air flaps under the cowling. There are two vacuum hoses going into the actuator on the driver's side and one going into the actuator on the passenger side. The other ends of those hoses plug into white plastic fittings on the bottom wall. Those plastic fittings are held in place by friction only, from the underside. Be careful not to dislodge them because they are a royal PITA to reinstall from below.
If, after having gone this far, you still haven't isolated the vacuum leak, we will need to delve into the area under the dashboard. The most likely culprits at that point are (a) disconnected vacuum hoses, or (B) worn out actuators that control vents and flaps inside and around the heater box. I have plenty of pictures that will help you if that's the case.
Also, while doing all of this, I highly recommend that you replace all of the rubber vacuum hoses, at least the ones in the engine bay and underneath the blower cowling. They tend to become leaky over time due to the temperature extremes. In my experience, the hoses on the inside of the car rarely fail. It's usually the diaphragms in the actuators that let us down.
Here's a link to my earlier post about rebuilding the heater box. It includes good photos of the vacuum actuators, their locations under the dash as well as photos of broken vacuum actuators that have been disassembled so that you can see how the diaphragms operate.
Heater box and heater core rebuild and repairHeater box and heater core rebuild and repair
I hope this wasn't too much at once. Please feel free to ask questions.
David Cecil